FTP Client UI for Editorial
(▼)(▲) Permalink
 App.net
 Twitter
 Facebook
 Google+
 Pocket
 Instapaper
 Email
Email
August 19, 2014
I recently started playing around with the UI module built into the fantastic iOS apps Editorial and Pythonista. In need of a project to learn on, I decided to take a Python script I wrote last year for connecting to a server and manipulating files over FTP (File Transfer Protocol) and build a User Interface for it.
I built this website from scratch and have it hosted on a standard Apache server, so the only way for me to access my files is with FTP. My script from last year defined a class named FTP_Client which had various functions for standard FTP commands such as creating and uploading files, creating and navigating folder directories, and downloading and deleting files. The script was written in Pythonista, so it took a little tweaking to move to Editorial, but nothing too difficult or confusing. The biggest difference is that Editorial can't import Python scripts from other files, which means the entire FTP class has to be included in the code of any UI which uses it instead of keeping it in its own file and just calling from FTP import FTP_Client to use the class in another script.
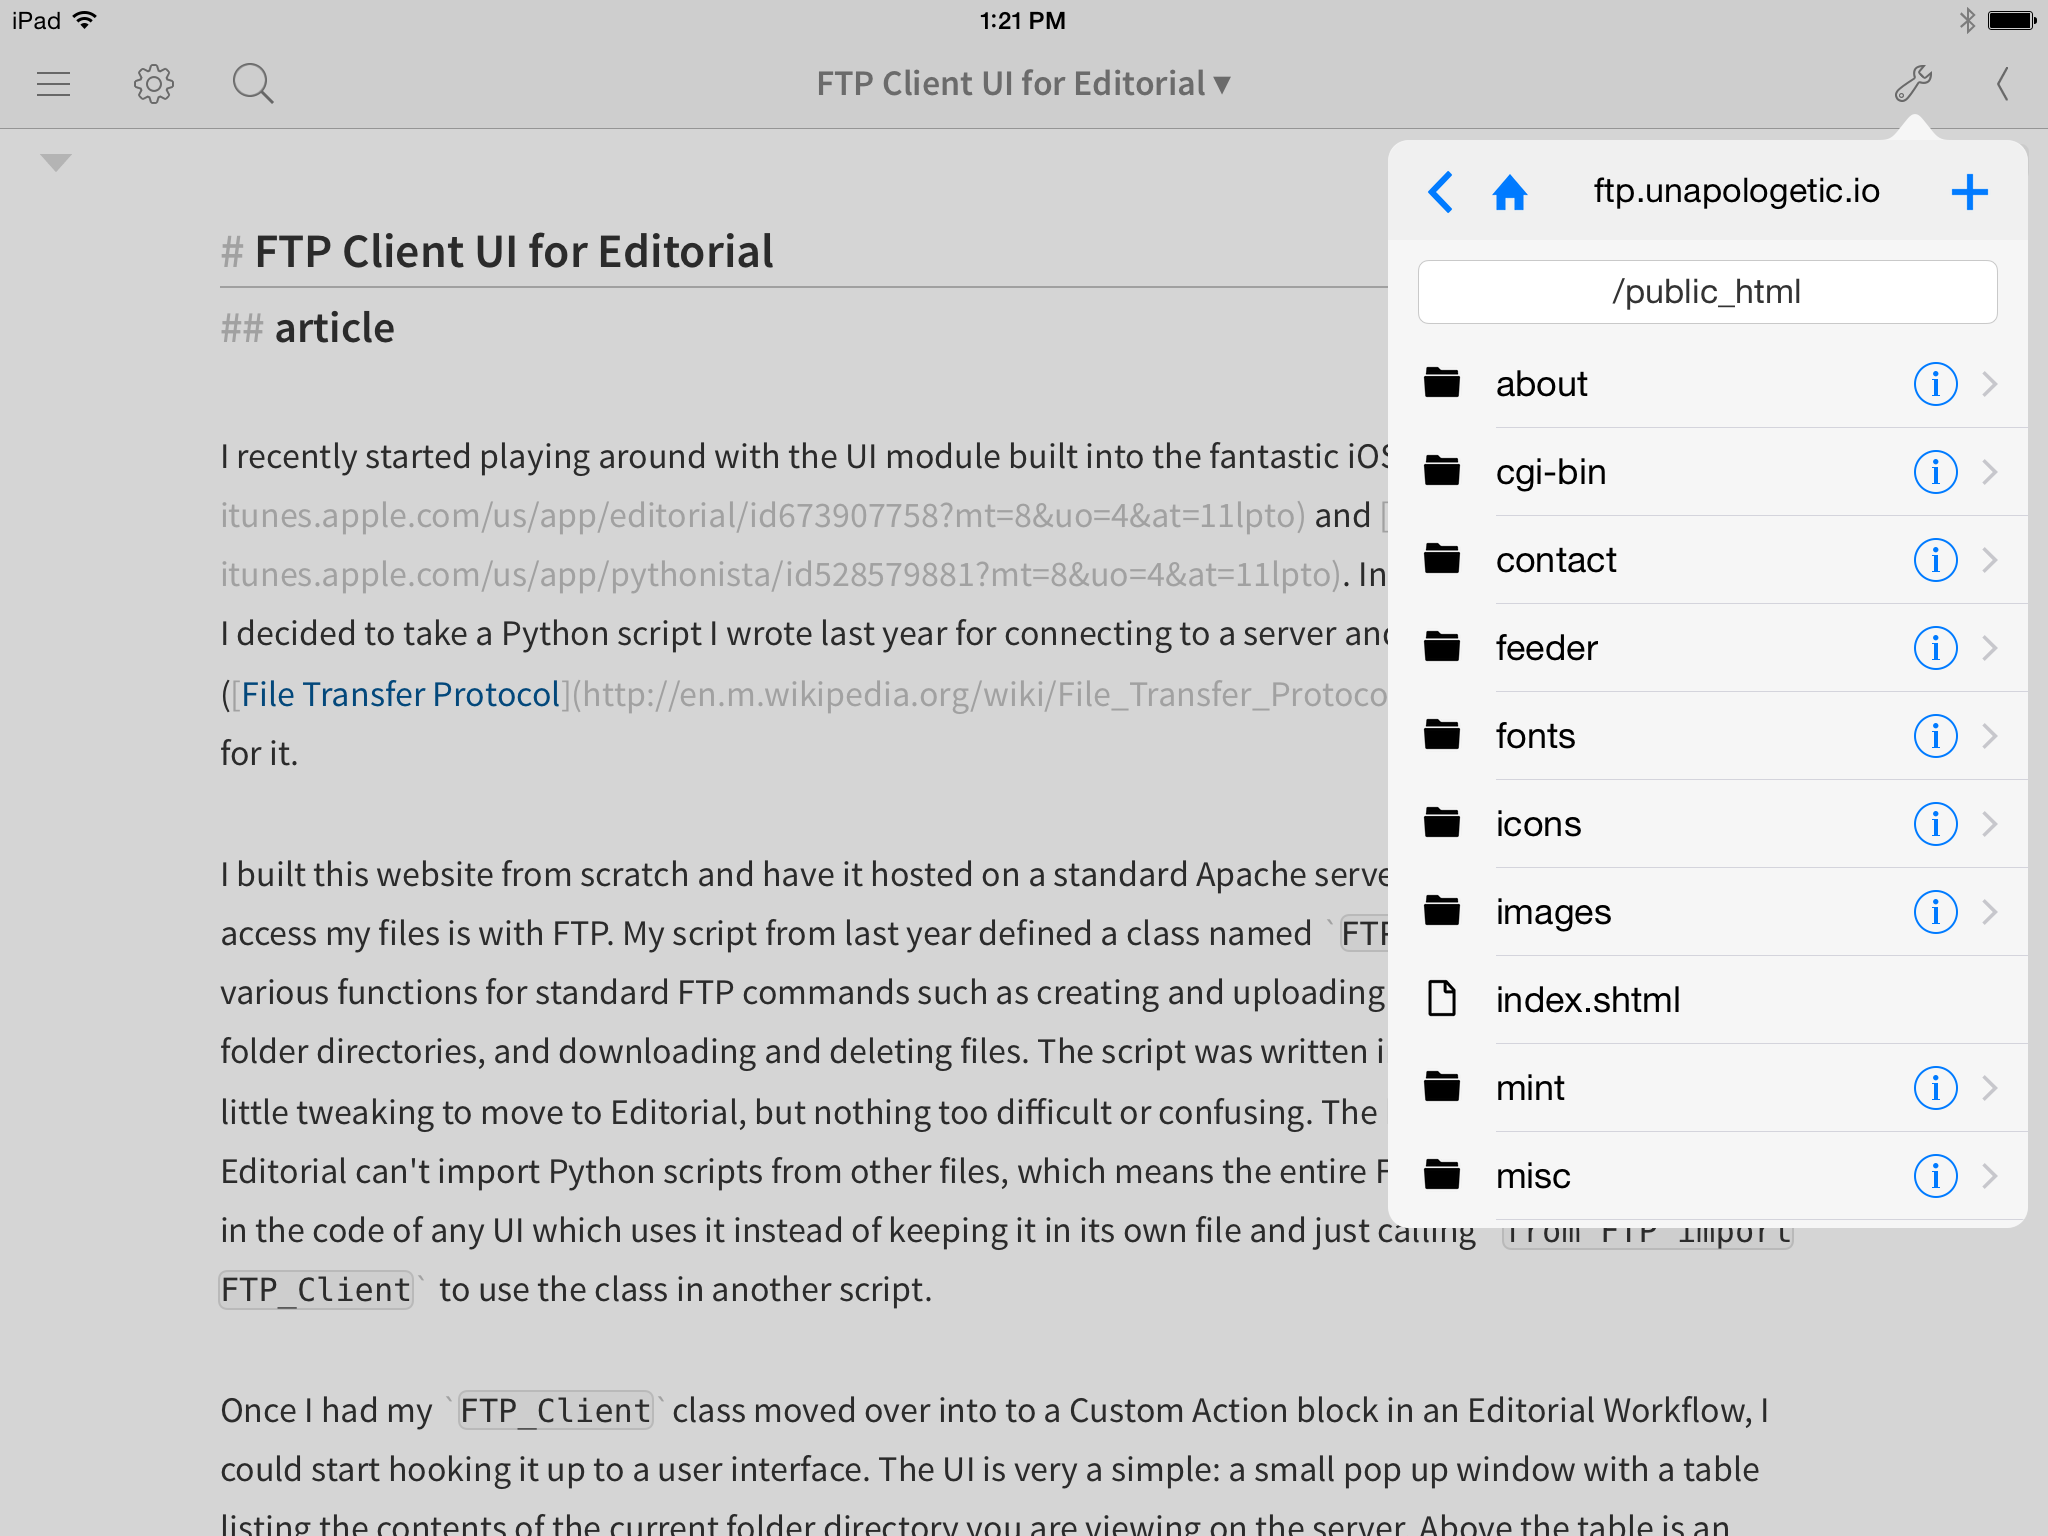
Once I had my FTP_Clientclass moved over into to a Custom Action block in an Editorial Workflow, I could start hooking it up to a user interface. The UI is very a simple: a small pop up window with a table listing the contents of the current folder directory you are viewing on the server. Above the table is a text field to display the path of the current directory. This field is editable, so if you manually type in a path and hit return you will be taken to that path on the server (assuming it exists). Above the path field is a navigation header with a label (the name of your FTP server) and three buttons. The first button is a back button, which will navigate backwards one directory; the second is a home button, which will navigate to your chosen home directory no matter where you are; the last is a plus button, which allows you to upload a file or create a folder within the current directory.
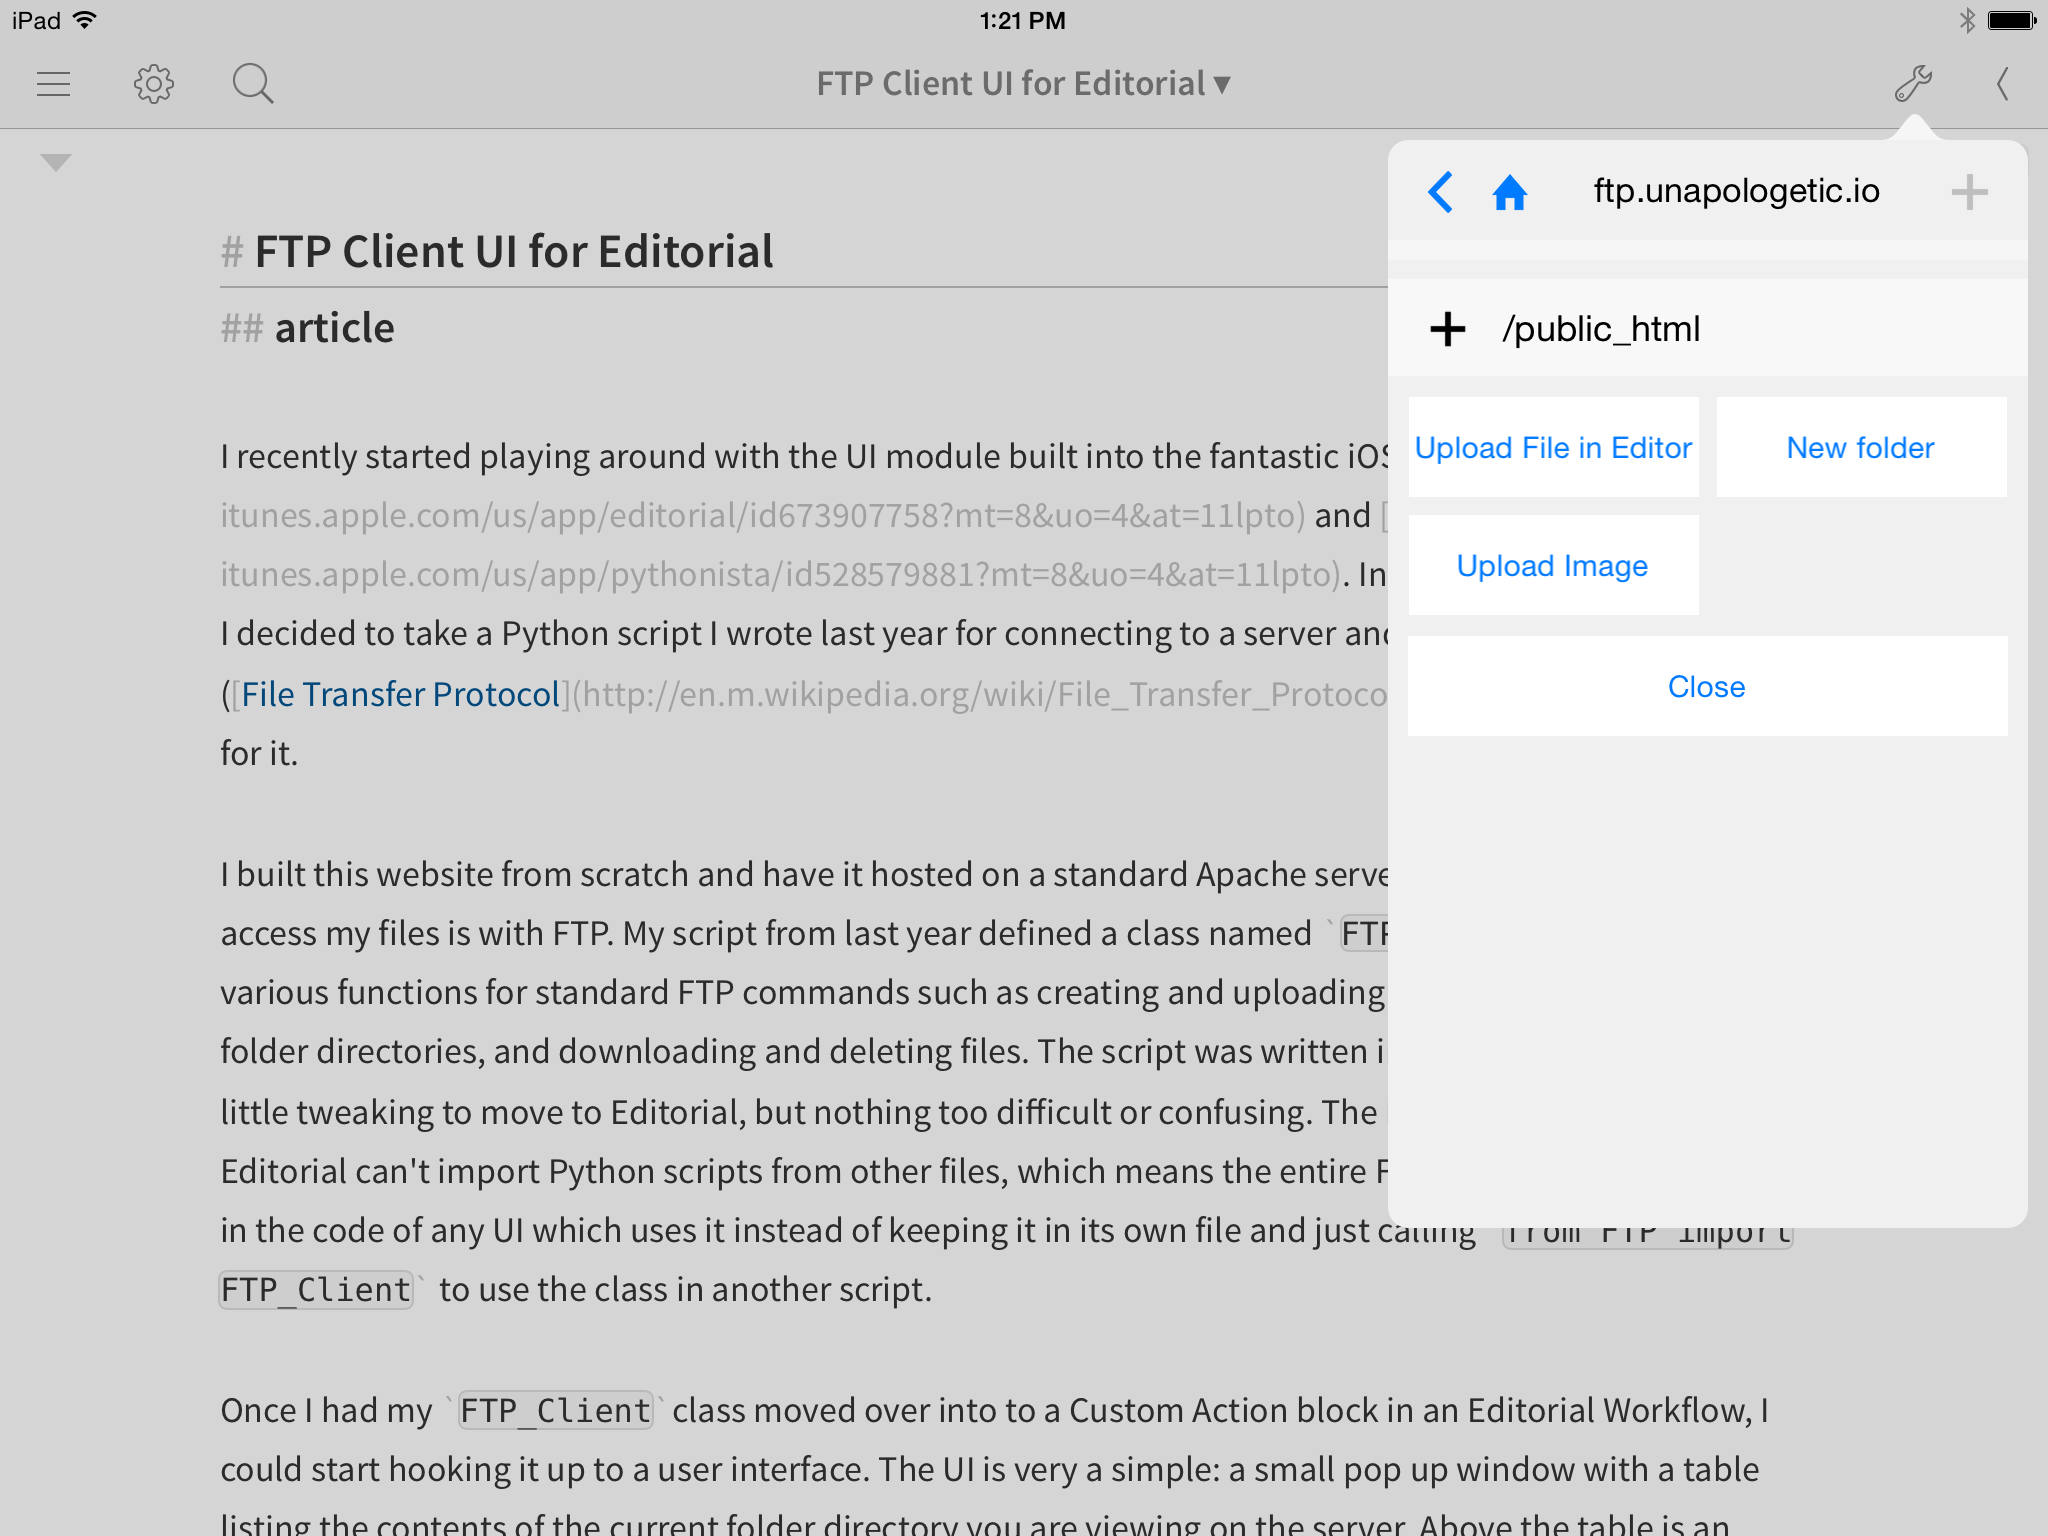
There are only two other views in the UI: a view for button actions and a secondary view to confirm your choice when you tap a button. The button actions view can be accessed in three different ways and will display a different set of buttons depending on which way you access it. The aforementioned plus button will bring up the button actions view with three buttons: one to upload the file that is currently open in the editor, one to upload an image from your photo library, and one to create a new empty folder. Above the buttons is a text label which will display the current path, where the file/folder will be added. There is also a another button, always present at the very bottom of any button actions view, which allows you to close the view (▼)(▲)Anytime a button actions view is open, the back button in the navigation bar also takes on this same function, and will simply close the open view instead of taking you back a directory.. Upon tapping any of the three action buttons you will be presented with the secondary action view. Here the label that was displaying the path changes to an editable field in which you will type the file name or folder name for the new item you are adding. This view always has only two buttons, the first to confirm the action you picked in the previous view and second to cancel it and return to the main button actions view. For the plus button actions, the confirm button (labeled "Upload File", "Create Folder", or "Show Image Picker" depending on which button you tapped in the previous view) is disabled until you have begun to edit the text in the file name/folder name field, so that you don't forget to actually pick a name for your file before uploading. When you tap the confirm button you will be returned to the main view with the new item added (the exception being the Show Image Picker button, which will first have you pick an image to be uploaded under the chosen name before returning to the main view).
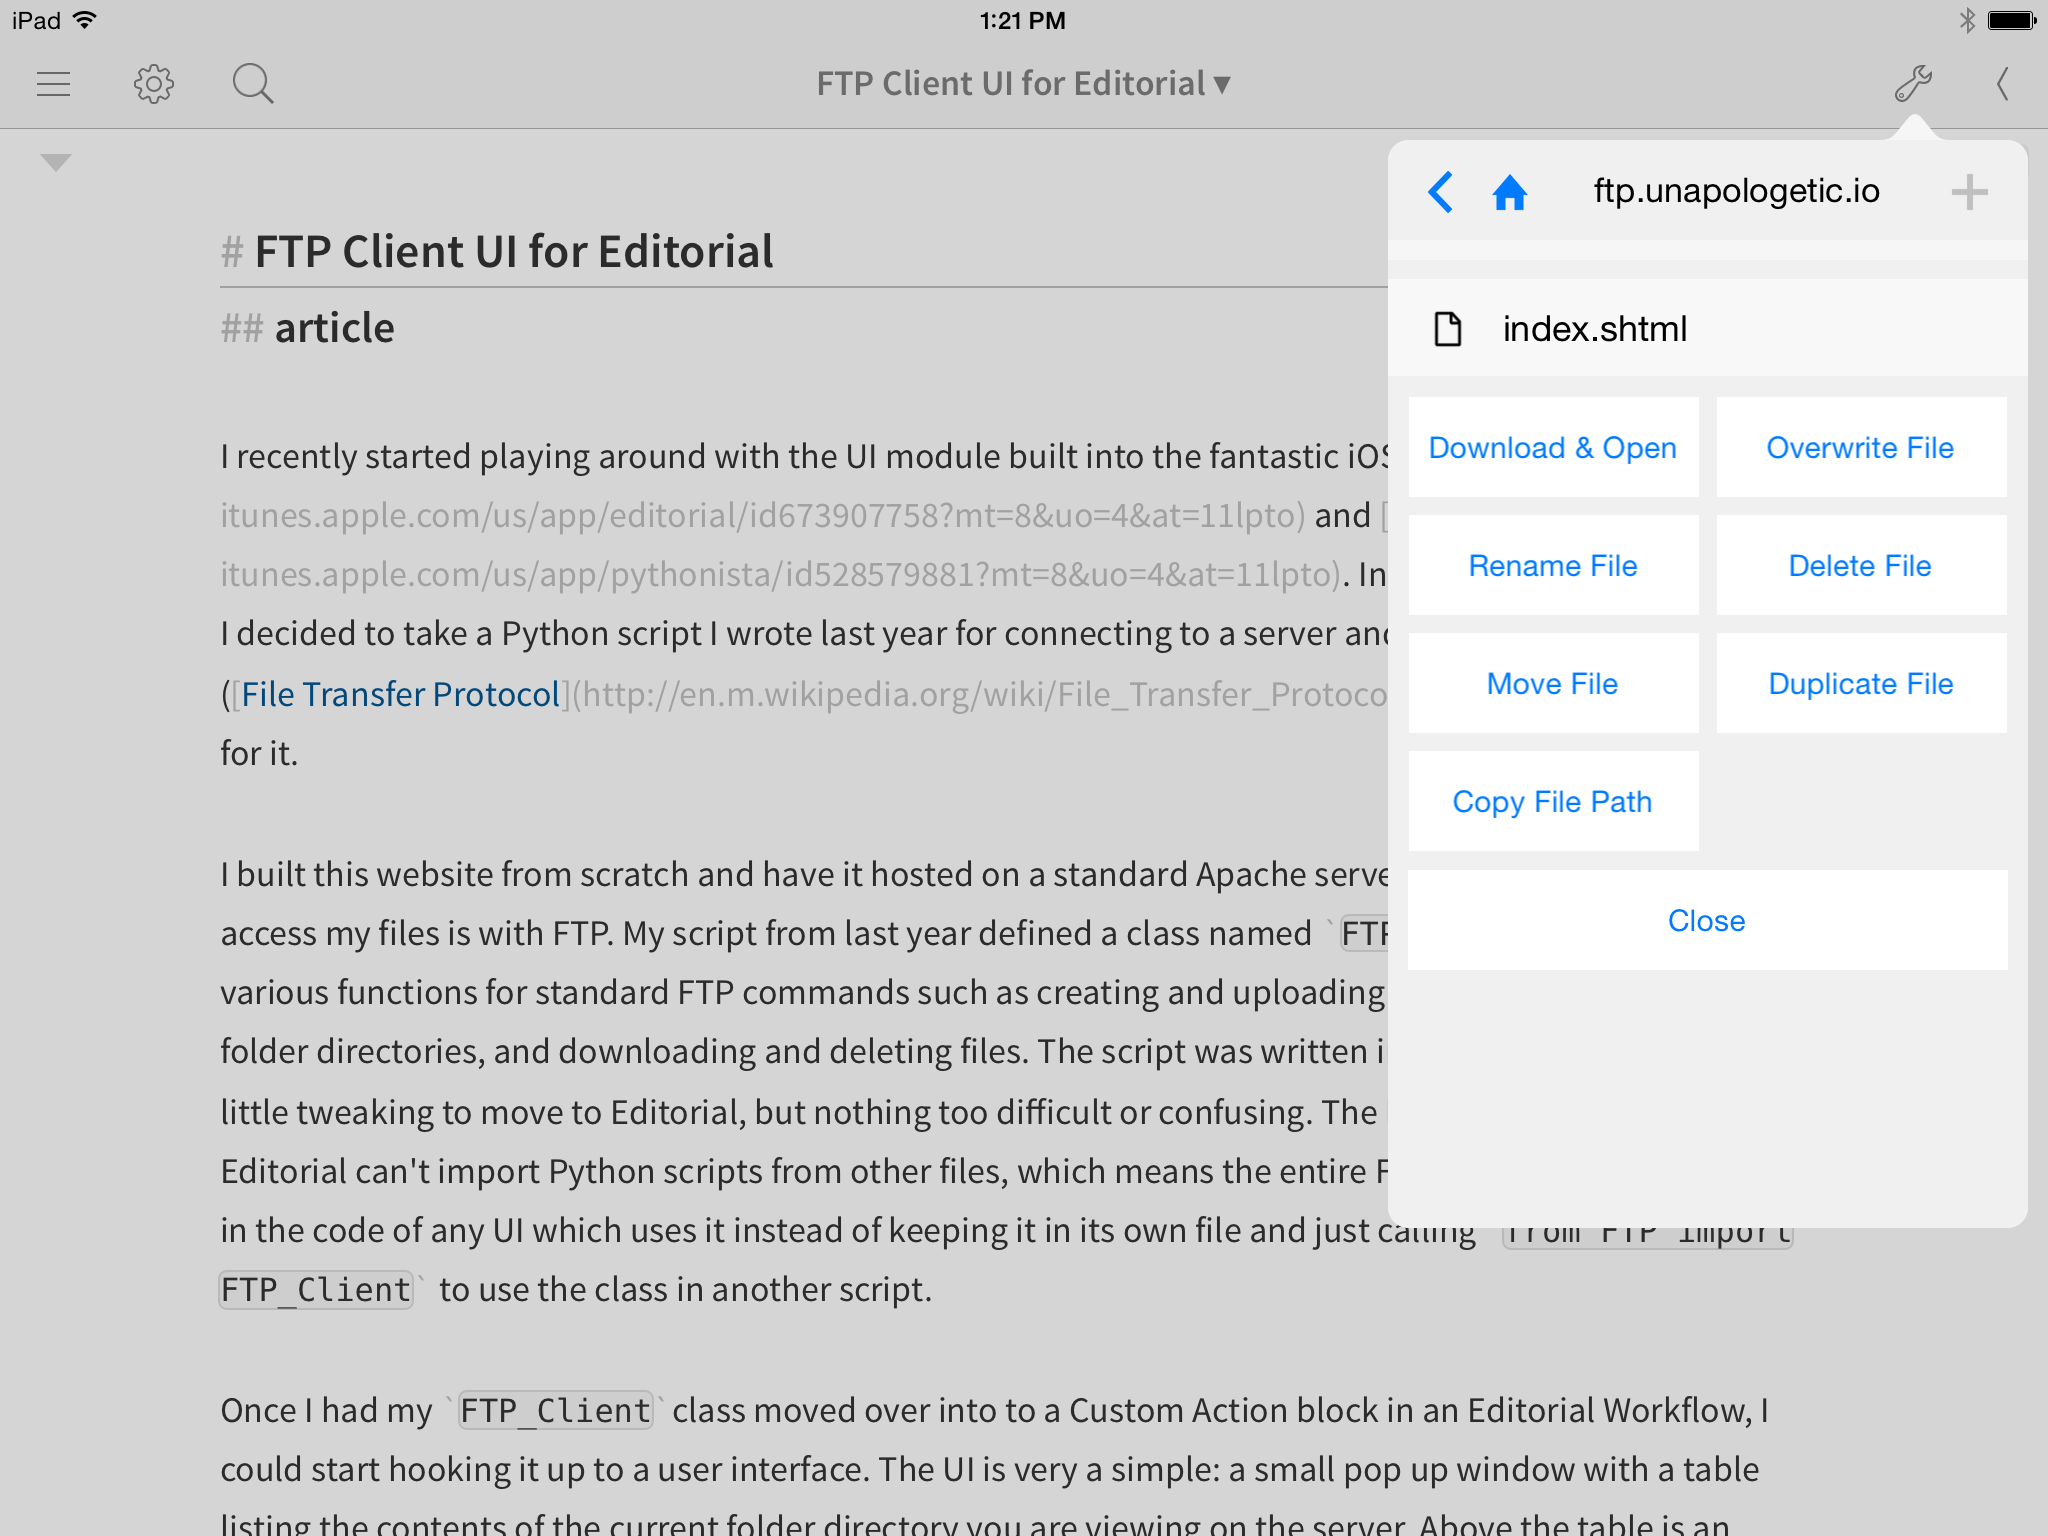
The next way to open the button actions view is by tapping anywhere on a file within the main table. Files are differentiated from folders by the small file icons on their left (▼)(▲)Furthermore, files have no other markings while folders' left-side folder icons are joined by small info buttons on their right sides as well as chevrons indicating they lead further into the hierarchy.. When you tap a file the button actions view appears with now seven different buttons, plus the Close button at the bottom. These allow you to download and open the selected file, overwrite it with the file in the editor, rename it, delete it, move it, duplicate it, or copy its path on the server. Above the buttons is a label which displays the filename of the file you selected. The download and open button will immediately download the file and open it in the editor in Editorial, dismissing the entire UI as it does so. The Copy Path button simply copies the path and gives you a HUD alert that it is on your clipboard. All the other actions will first ask for confirmation before performing actions which are in some cases unchangeable. The Rename button acts similarly to the plus button secondary actions, disabling the confirmation button until you have typed a new name for your file. The Move File button is the once exception to all the other rules, as it opens a unique view available only to itself and the Move Folder button.
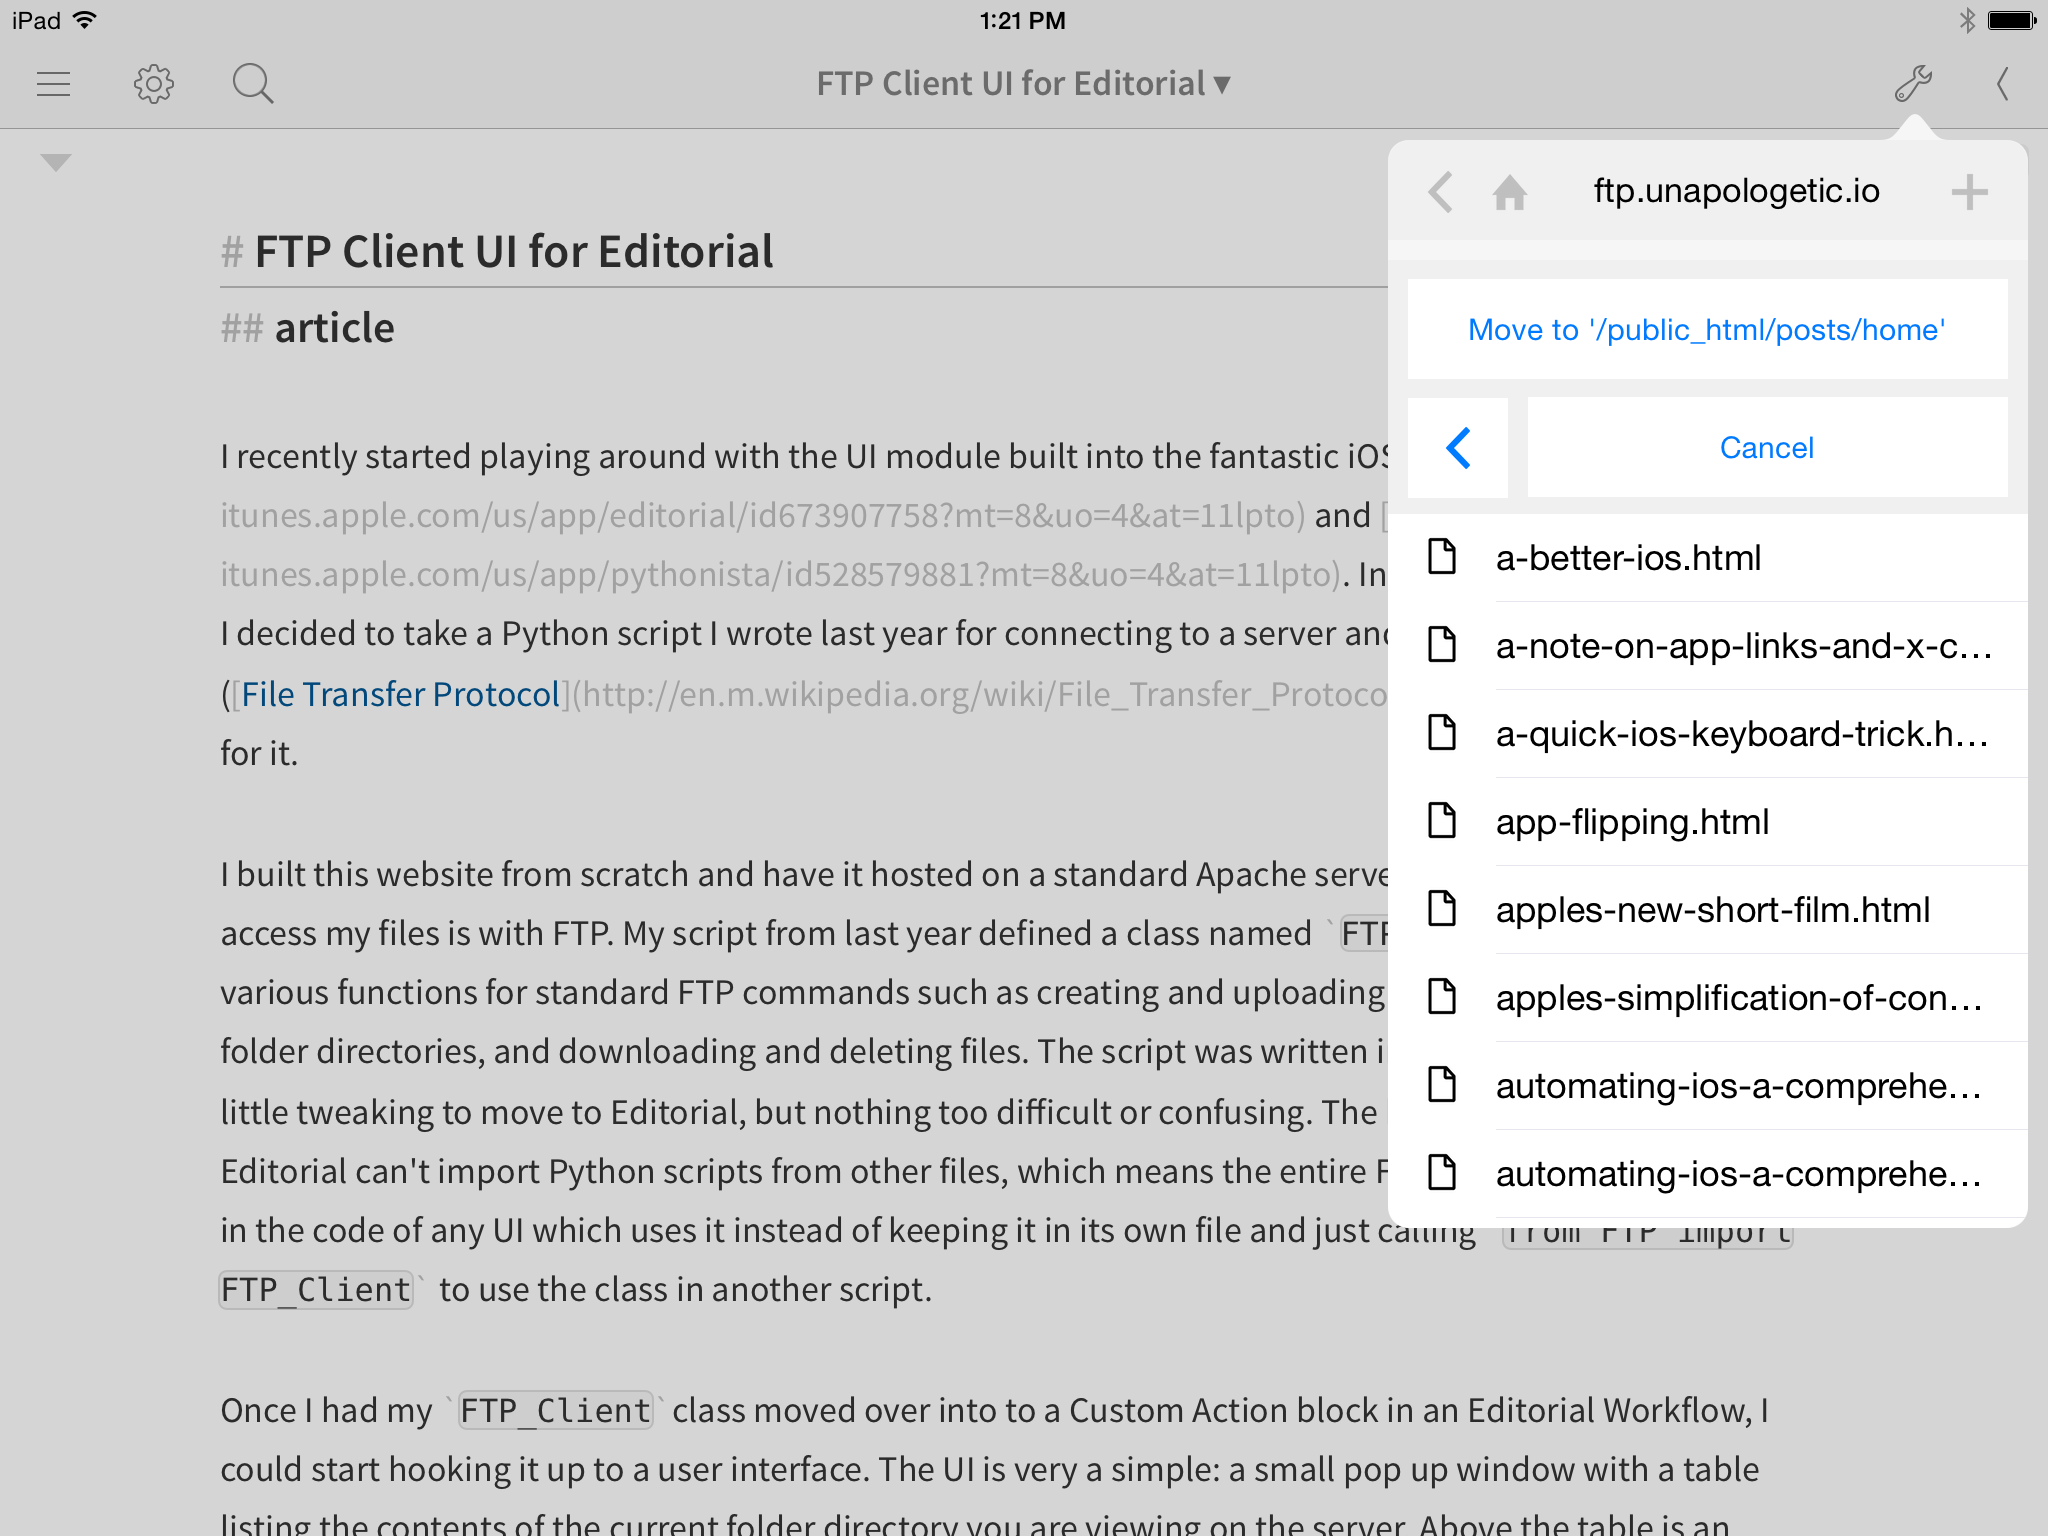
This view displays a slightly shorter version of the main table, located beneath a large button with title "Move to" followed by the path of the directory the shortened Move table is displaying. Beneath the Move to... button is a duplicate of the main back button, but this one will navigate backward only in the Move table instead of in the main one. Next to the back button is a cancel button to cancel the move and dismiss the view. Within the Move table, folder info buttons are no longer present. Files can be seen, but tapping them does nothing. The view's only purpose is to let you navigate through directories by tapping folder names until you reach the directory where you wish to move the file. Then tap the Move to... button and the view is dismissed and the file relocated to the chosen directory.
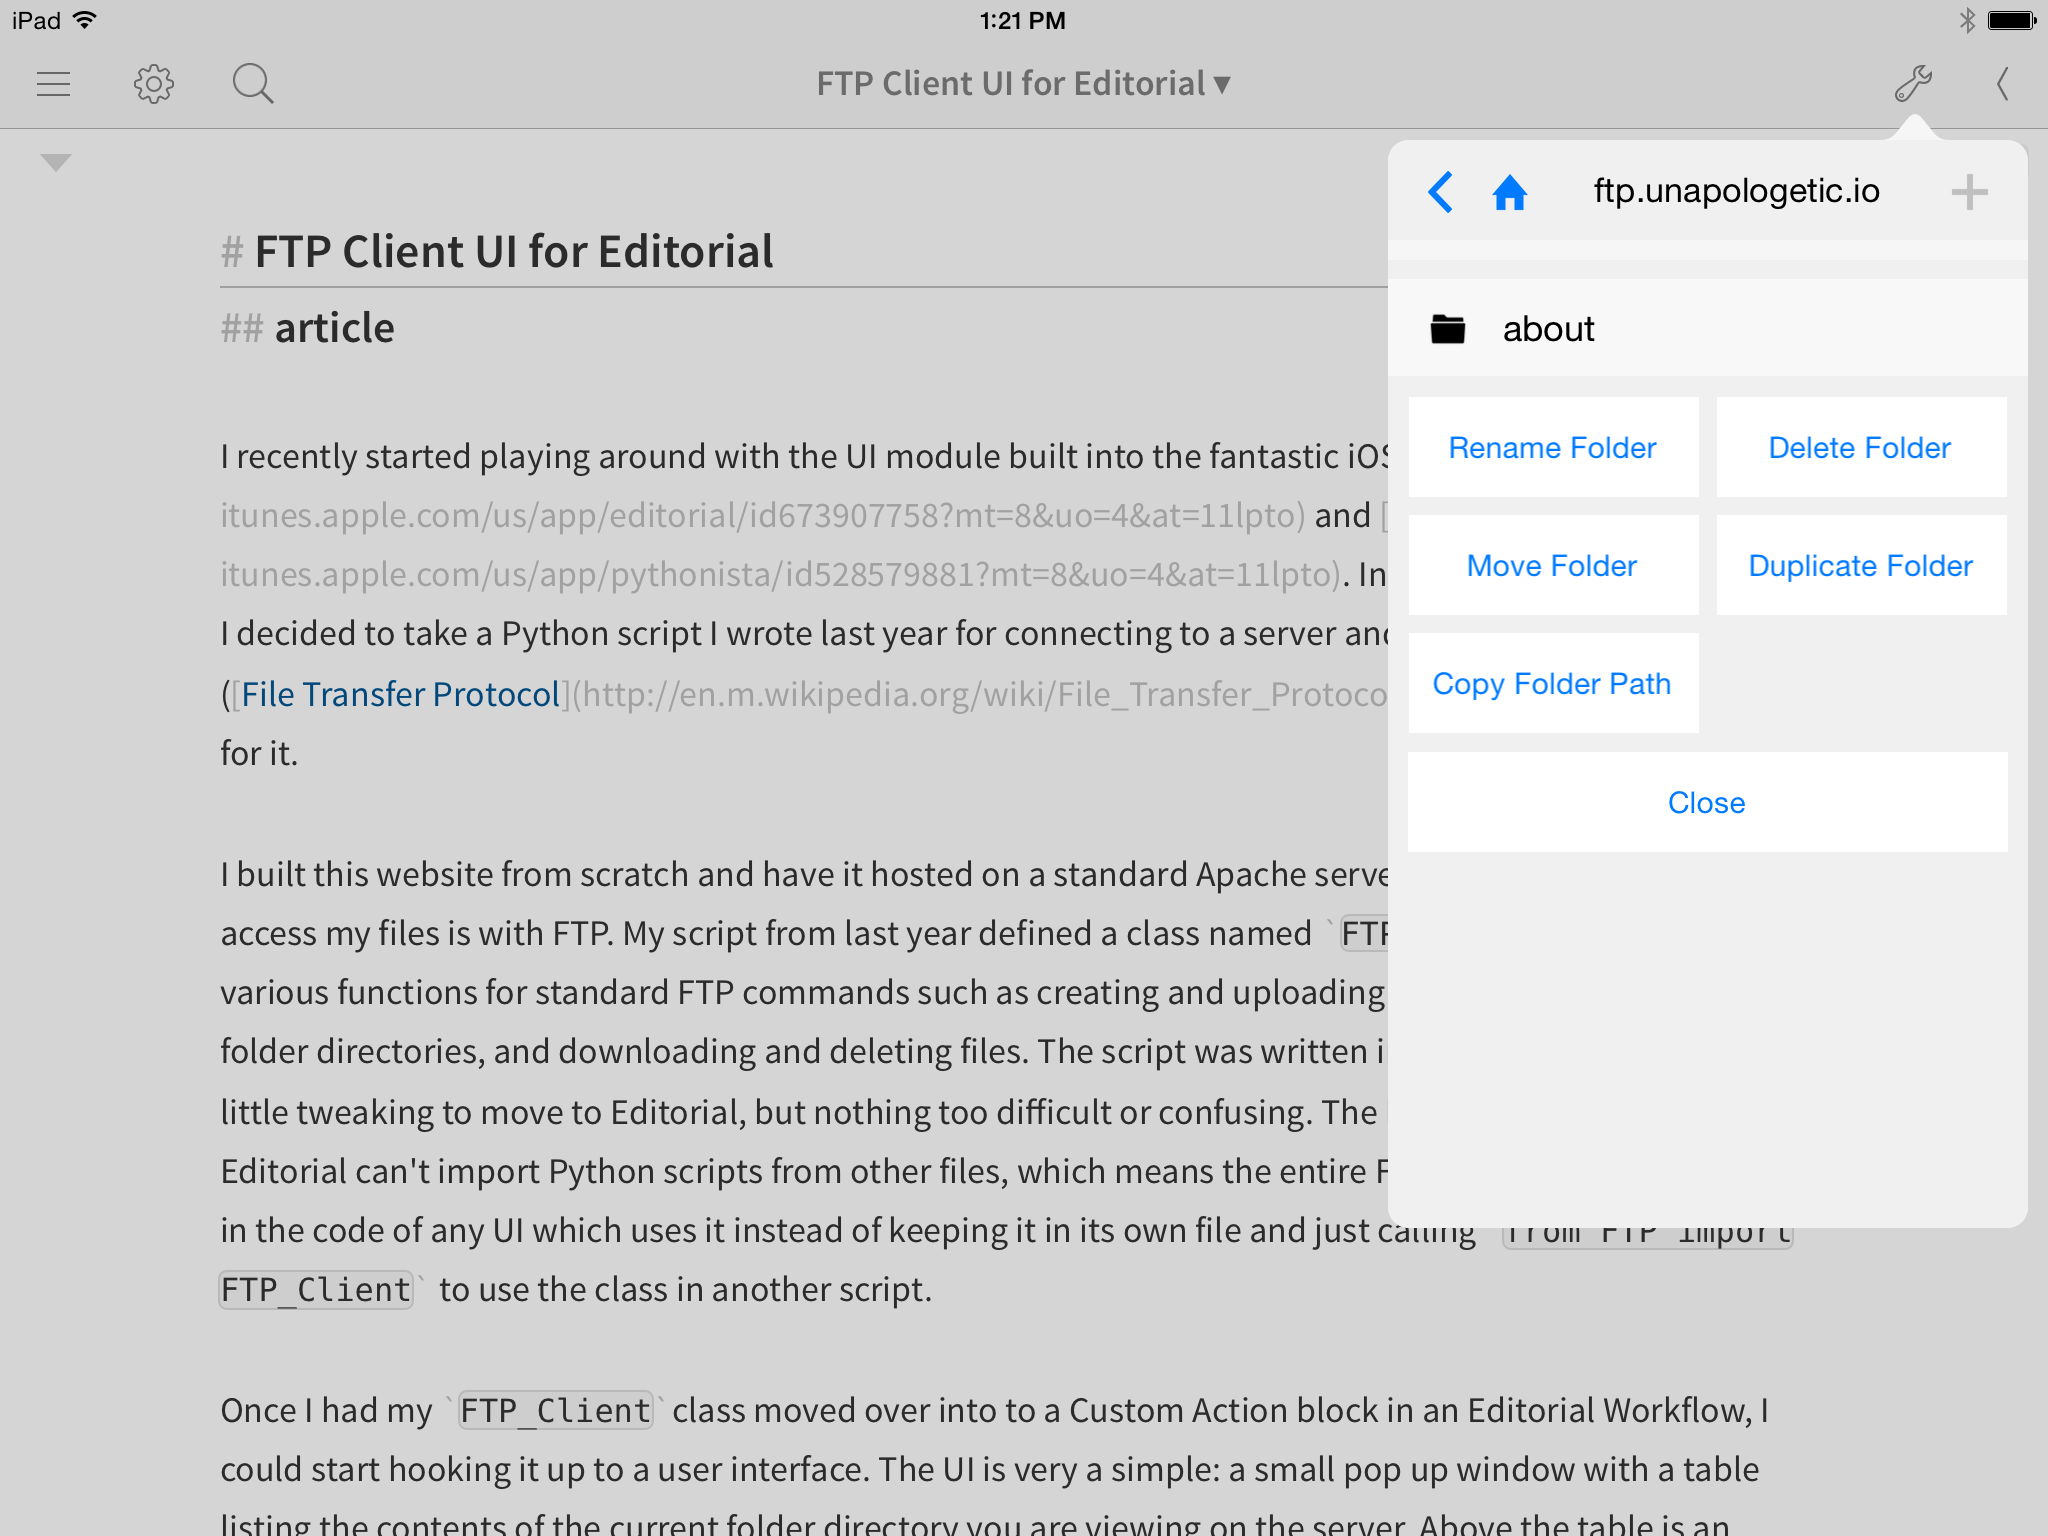
The final way to open the button actions view is by tapping the info button on the right side of any folder. This opens the folder specific button actions view, which contains only five buttons beyond the normal Close button. Folder button actions allow you to rename the folder, delete the folder, move the folder, duplicate the folder, or copy the folder's path. The label above the buttons shows the name of the folder you tapped the info button on. The buttons themselves work just like their file button action counterparts. Make note that deleting, moving, or duplicating a folder will also delete, move, or duplicate its entire contents, and these actions (particularly the delete action) cannot be undone. One thing to note is that FTP is a slow protocol (or at least the servers it is connecting to are slow to respond), especially so if you are on a subpar internet connection. Thus, performing actions which require a large amount of server calls can take quite a long amount of time. This mainly goes for the three actions mentioned above. The most complicated actions (code-wise) within the entire UI, moving, deleting or duplicating a folder requires the script to navigate all the way into every folder within the selected folder and duplicate, move, or delete those folders and the files within them. Depending on the size of the directory you chose, this can require a large amount of work and many calls to the server over FTP.
While I may do something about this in the future, as of now the UI does absolutely nothing while it is waiting for a return from an FTP call to the server. As such, Editorial will appear frozen during this time. Generally you can tell it is still doing something because the button you tapped will appear "held down" until the function is finished, but sometimes if you tap the button too quickly it won't have time to change its appearance before the app freezes up waiting for a server response. I've done extensive testing myself, as well as enlisting a small team of testers to try the UI out themselves, and I'm fairly confident that any bugs in the code which could actually freeze the app have been squashed, so just bear with it while it is slowly getting through your command. There is a very low chance that nothing is actually happening, even if it may seem like it when you have to wait for 30 seconds to a minute on big folder-related tasks.
Set Up
If you're interested in trying out the UI yourself, there are only a few steps you need to take after installing the workflow. Obviously, you need to fill in your credentials. The obvious way to do this would be to request them the first time you run the workflow, but that would require a lot of extra code on my part, as well as finding some place on your device to store the values, which could accidentally be deleted or otherwise lost. For simplicity's sake, I just made them variables in the Custom Action block of the FTP Client workflow.
To enter your login information, when you first install the workflow, tap the info button on its right side and choose "Edit Workflow...". This will bring up a view with a large block labeled "FTP UI". Tap somewhere on the block and it will expand to reveal four variable values: Initial_Path, FTP_Server, FTP_Username, and FTP_Password. The last three are self explanatory, but Initial_Path is important because this is the directory to which your UI will automatically open to every time you launch it. This is also the directory that the home button on the main navigation bar will direct you to. If you don't want to set an initial path, but just want to start on the topmost directory of your server, just set this value to /.
The last thing to note is that, unfortunately, there is no way to make the password field conceal your password, so while it is fairly hidden based only on its location, it's worth keeping in mind that your password will be displayed in plain text to anyone who might for some reason go through the steps of editing the workflow and opening the list of variables.
iPhone
While I've only done limited testing, the UI should work fine on iPhone. There is no extra code to distinguish the iPhone version from the iPad version, but the only two differences I found this to cause we're that the status bar on iPhone is annoyingly close to the navigation bar buttons (a minor detail which doesn't actually affect usability) and there is no obvious way to dismiss the view since you can't just tap off the side of the pop up like on iPad. You can still dismiss the view however by swiping downward with two fingers, a feature built into all Editorial UIs which do not show the default title bar. At some point in the future I may build a tweaked version that is more obtomized for the smaller display, but for now it works well enough.
Where to Get the UI
If you wish to get your hands on the UI, you can download and install it on your iPad or iPhone from here.
If you have questions or comments, or find any bugs that need fixing, please drop me a line. Enjoy!